
Microphone not working in DayZ? Fix it Here
DayZ is a very interesting post-apocalyptic game that thousands of players enjoy daily. However, we have recently seen a trend. Where users complain about the Microphone not working in DayZ. Luckily for you, in this article, we have compiled all solutions that will help you in fixing this issue. In addition, we have gone through the different reasons why the microphone doesn’t work in DayZ.
Why is the Microphone not Working in DayZ?
After having to fix this issue for our users. We concluded that the following are the primary reasons why the Microphone doesn’t work.
- Wrong Microphone Selected: If the wrong Microphone is selected, this issue can crop up. Basically, Windows selects the default input and output audio devices on your computer. If Windows has the wrong one configured, the Microphone will not work in DayZ.
- Exclusive Mode in Settings: Sometimes, the exclusive mode settings for the microphone cause this. Thus, you can try to disable the exclusive mode for your microphone from your settings. To do this, simply navigate to the audio settings.
- Interference from Drivers: If a lot of audio devices are set up on your computer, this issue can arise. What happens is that the drivers interfere with each other. This can be the reason why the Microphone is not working in DayZ.
- Issues with Audio Interface: Some audiophiles tend to use complicated audio interface setups. For music and recording, this might be very fun and easy to use. However, with games and applications, it can get complicated. Thus, your custom audio interface setup can be the issue.
Now that you know why the microphone doesn’t work in DayZ. It is time we move on to fix this problem.
How to Get the Microphone Working in DayZ:
Note: Sometimes, simply plugging and unplugging the headphones while in-game does the trick.
Solution 1: Select Appropriate Device in Settings
It is possible that the issue occurs because the proper device isn’t selected in your settings. First of all, we will be going through the settings to configure the right device. For that:
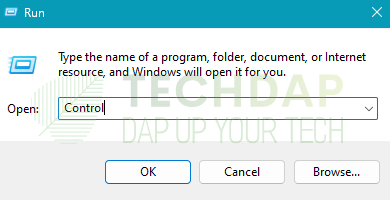
- Press “Windows + R” to launch the Run prompt, and type in “Control” to start the control panel.

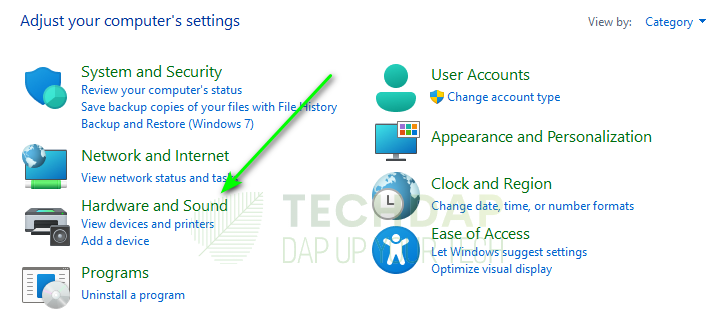
Opening Control Panel - From here, select the “Hardware and Sound” option.

Opening Hardware and Sound - Select the “Sound” button and it should open the sound control panel.
- Inside this panel, select the “Playback” option from the top.
- Now, right-click on your playback device and select the “Set as Default” option.
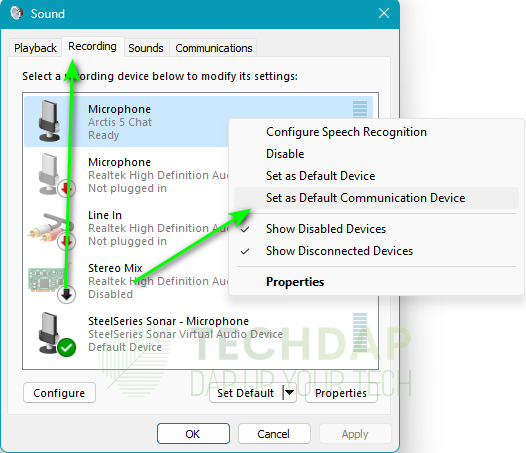
- Similarly, click on the “Recording” tab from the top.
- Now, select the input device or your microphone and right-click on it.
- Once again, select the “Set as Default Communications Device” option.

Clicking on “Set as Default Communications Device” option - If that option isn’t available, select the “Set as Default” option.
Solution 2: Allow Applications to Use Device (Windows 11)
On Windows 11, there is an exclusive privacy setting. This setting prevents applications on Windows from using your microphone. We will check and make sure that this setting is properly configured for your device. To do that:
- Click on the “Speaker” icon at the bottom right side of your screen.
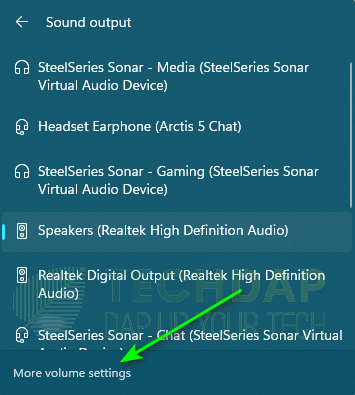
- Select the “Device Icon” from the settings pane and select “More Volume Settings”.

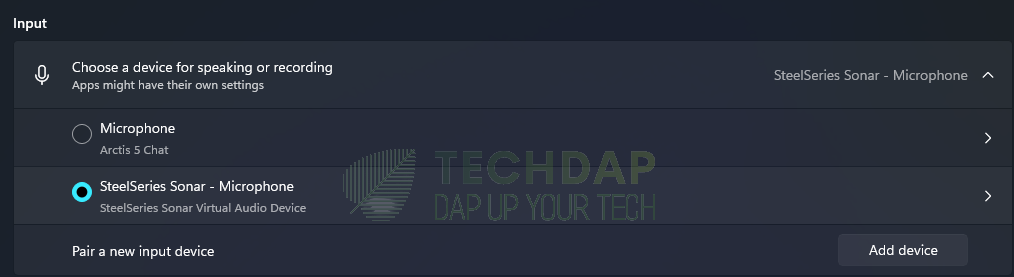
Selecting “More Volume Settings” option - Now, select the “Input” device that you are using from the list.

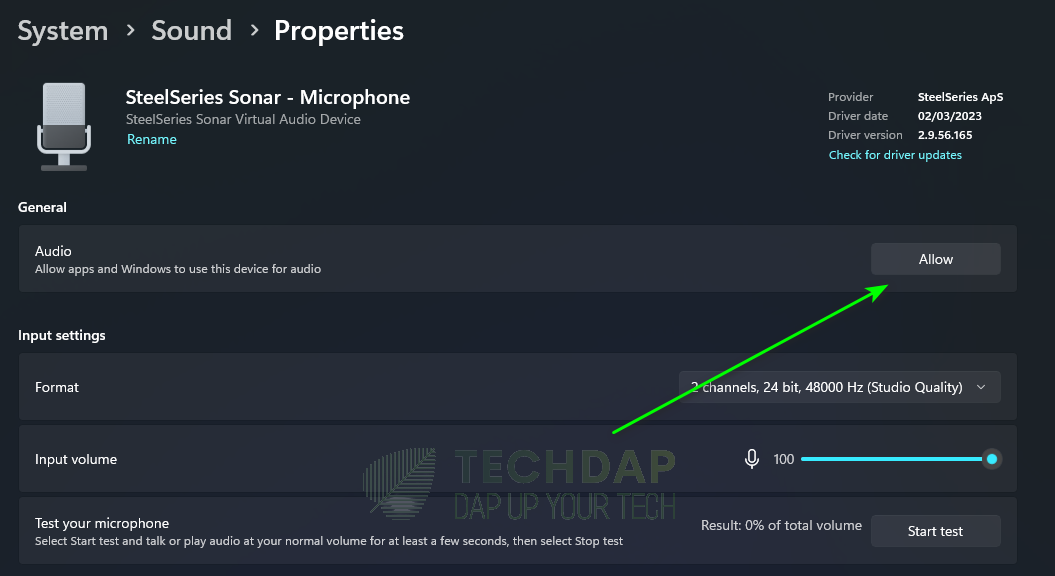
Selecting Input Device - Make sure that the “Allow apps and Windows to use this device for Audio” setting says “Allow”.
- If it says, “Don’t Allow”, click on it to change it to “Allow”.

Allowing Access to the Microphone - Now, also ensure that the “Input Volume” is at the max.
- Check to see if this fixes the Microphone not working in DayZ issue.
Solution 3: Configure Steam Microphone Settings
If Steam is unable to pick up the microphone that you are supposed to use, the issue can arise. Therefore, we recommend that you set it manually inside Steam settings. To do that:
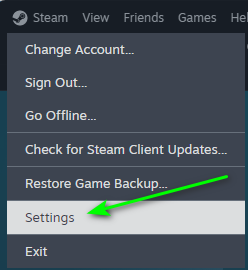
- Launch Steam and click on the “Steam” option at the top right side.
- From there, select the “Settings” button.

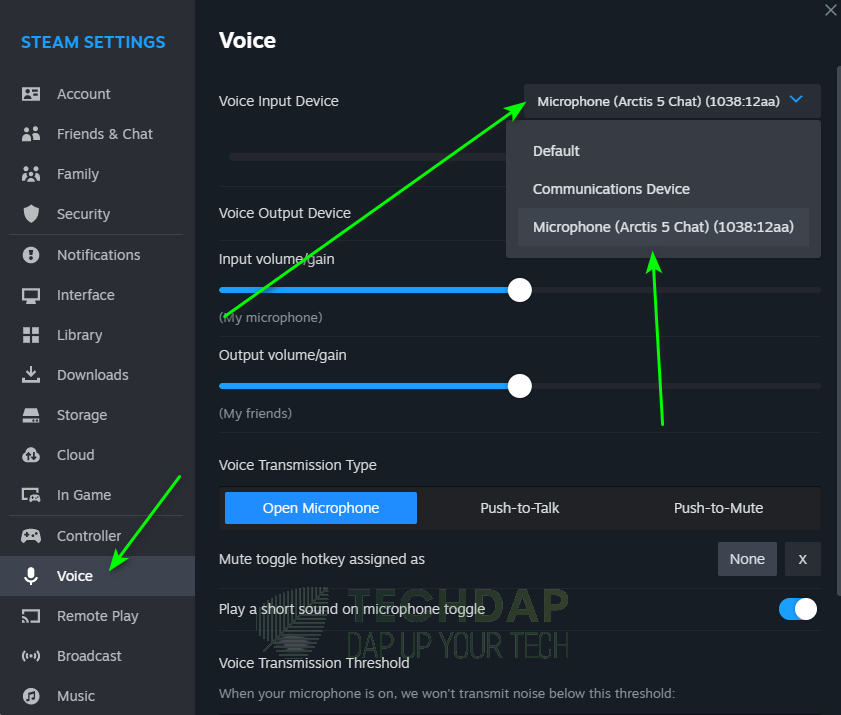
Opening Steam Settings - Inside settings, select “Voice” from the left side.
- From here, select the “Voice Input Device” button.
- From the dropdown next to it, select your input device.

Selecting Appropriate Input Device - Make sure that you select the correct device and then select “Start Microphone Test“.
- Talk into the microphone and see if you can hear yourself.
- If you do, this ensures that Steam recognizes your microphone.
- Save your settings and check if this fixes the Microphone not working in DayZ issue.
Solution 4: Change Voice Detection Method in DayZ
After a recent update, the auto voice detection method was added. This change might replace your default push-to-talk method. Thus, we ask you to make sure that your correct method of sound input activation is selected. For that:
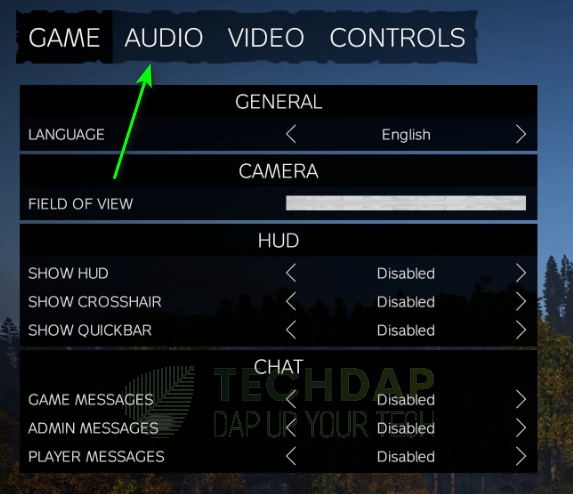
- Launch DayZ on your computer and go into settings.
- From the settings, select the “Audio” tab and then select the “Voice” tab.

Selecting “Audio” option - Here, make sure that the “Input Mode” is set to Push to Talk and that the button is configured properly.
- Now, check if you are able to talk on the Microphone and everybody hears you in DayZ.
Solution 5: Disable Exclusive Mode for Microphone
Sometimes, if you allow applications to take over exclusive control of your Microphone, this issue can come up. This happens because the app doesn’t allow any other app to use the microphone. To fix this:
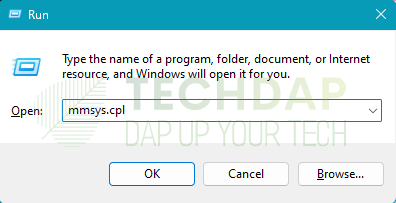
- Press “Windows + R” to launch the Run prompt.
- From here, press “mmsys.cpl” to launch into the sound settings.

Typing in “mmsys.cpl” - Now, click on the “Recording” tab and then double-click on your device.
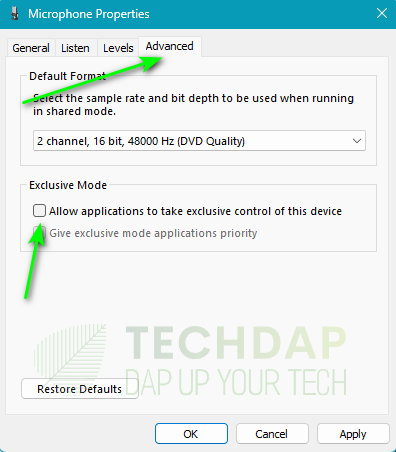
- From here, click on the “Advanced” tab.
- Now, make sure that you uncheck the “Give Exclusive Mode Applications Priority” option.
- Also, uncheck the “Allow applications to take Exclusive control of this Device” button.

Clicking on “Advanced” and unchecking “Exclusive Control” options - Select “Apply” to save your changes.
- Check to see if your Microphone in DayZ now works normally.
Solution 6: Reconnect your Wireless Dongle
If you are using a Wireless headset such as a Razer one or any other brand. It is possible that its signal can get interference from other wireless devices. Thus, you should try to move the USB dongle responsible for providing wireless to the device. You can connect it to another USB port and try to space them out so that the interference is eliminated.
Solution 7: Restart your Console
Sometimes, users discovered that a simple clean-restart on the console fixes this issue. Thus, before you start your gaming session, go through the following steps.
- Unplug your console’s power cable from the wall.

Unplugging the Console - Now, press and hold its power button for at least 10 seconds.
- This will drain any static electricity from it.
- Plug the console back in and power it up.
- When it powers up, check to see if the DayZ microphone issue is gone.
Solution 8: Change Channel
If you are using a complicated audio interface on your system. You should try to change the channel in which your XLR cable is plugged into. This has worked for some users. Also, changing different cables on the system can sometimes get rid of a faulty cable or a port.
Solution 9: Set the Proper Device on Voice Software
If you are using software such as voice meter or any other voice-changing software. It is important that you have selected the proper input device inside it. If you haven’t selected your mic, it won’t work in DayZ. Thus, depending on your software, make sure the correct configurations are in place.
Solution 10: Reinstall GPU Drivers
Sometimes, the GPU drivers that are running on your system can cause this bug. Thus, you might have to reinstall them from scratch. For that, we recommend that you use the DDU software that helps in removing the GPU drivers. From there, you can go to your GPU manufacturer’s website and download the appropriate software. After downloading, simply install it on your computer and check if this fixes the error.
To Conclude:
The Microphone not working in DayZ is actually a very common issue faced by a lot of users. This issue mostly pertains to the appropriate microphone not being recognized by the game. To fix this, you simply have to reconfigure some microphone settings and it should work. If you still need assistance, feel free to contact us or raise your concern on the DayZ forums.
FAQ:
Why is the Microphone not working in DayZ?
As we mentioned above, this issue mostly occurs when Windows or your console is unable to recognize the mic. This happens when a lot of onboard hardware is detected and the OS cannot select the correct one.
Can you get the Microphone working again in DayZ?
Yes, in most cases, you should be able to get the microphone working again. However, if it still doesn’t work, you might need to replace your microphone or get help from the developers.